Which accessories do I need to complete my full e-nail setup?
Besides the power cord, your accessories are going to be at minimum: a heat coil, nail, rig, and essential oil dropper. The heating coil rests on the nail, which then sits inside of the glass joint. A capper (or a capper tool combo) is preferred by most. The only optional part in the setup IMO is the capper; but most people would also consider this to be essential as well. You will waste a lot more and taste a lot less without one. Also, a qtip holder can keep your q-tips ready to go and help keep your nail much cleaner.
OK I have un-boxed my e-nail controller and accessories, now what?
First, you may want to do a quick clean of any possible machine oil left on the heating coil using isopropyl alcohol. As far as setup and installation, after plugging the power cable and heating coil cable into the e-nail controller box, you are already 90% there! Install the heat coil to the nail (this will look differently depending on which nail you have). After inserting the nail/coil into your rig, you are now ready to flip on the power switch and start heating. For more info please see the RCCtools user guide.
Will your heating coil work with my controller box?
Heating coil mismatching is probably the most common issue that I come across with customers. In order to know if your e-nail and heating coil match, the relevant piece of information is the order of the 5 pins on the heat coil plug. The issue is that you can have two heating coils that both have the same 5-pin connector, however the wires are placed in different spots. This means you have an electrical mismatch and this can completely ruin your setup. There are a few ways to go about finding out how your e-nail heat coil and/or controller box is wired. Check out this blog post and if you still need help feel free to ask!
Can I use a new coil with a higher wattage than my original coil?
Sometimes you can and sometimes you can’t, but it all comes down to the internal relay. Most decent electronic nail controllers have a relay that is rated over 5A, but you need to make sure first. Thankfully 99% of heat coils you will find are going to be 100W.
How do I set the temperature on my enail?
You can adjust the set temperature by simply using the up and down arrows you see on the face of the LED screen and waiting for it to blink around 10 times. The screen will then switch back to the current temperature reading. From there just watch the temperature on the digital screen rise slightly past then fall back.
Why doesn’t the SET button work on my e-nail controller box?
A good rule of thumb is just to forget about the SET button. Don’t worry, most new e-nail users get confused with the function of the SET button. What does the SET button do on your e-nail? You may think it would mean your target temperature but that’s not exactly true. The SET button allows access to the more technical parameters of the e-nail such as PID values. One handy function that is less technical in this menu is the Fahrenheit/Celsius mode. However, 99.99% of e-nail users will want to just avoid this button. The up/down arrows are all you need to adjust the set temperature setting. It’s as simple as that! The screen will blink a few times on your screen before or during the change. Just let it happen and don’t press the SET button to confirm.
Do you leave your e-nail on all day or to switch it on and off multiple times per day?
Most people would prefer to only have their enail on while they are using it. This is because it can be very dangerous to leave a heated device such as these un-attended. Especially if you have pets or children, it’s a must to switch it off when out of the room. That being said, for the heating coil’s sake, it is slightly better to spare it from having to go though more frequent heating and cooling cycles. Also if you are conservative with energy like me, it seems like a waste to leave it on if it’s not going to be used within the next 15 minutes or so. It only takes a couple minutes to heat up from a cold start so it’s not worth the extra energy consumption or risk for me personally to leave it on all day.
What kinds of custom designs can you make?
You name it! So many designs are possible from re-purposing old toys to custom 3D designed cases for your dream project. Do you have any ideas in mind already or do you need help in hashing out what you are thinking? Either way, I can help. Keep in mind the more you have for me the lower the cost. If you have a 3D printed project in mind, it will be much more expensive if I need to do all of the design work. That being said, your design might be easy enough that the design work on my end is minimal. Often times we can find an existing object that can just be cut to fit the electronics without designing a brand new object from scratch.
How do I go about getting a custom American e-nail made?
If it’s an item that you want to make into a custom enail just send over any pictures or product pages you have through email. You will be asked to take some pictures and make a few measurements to determine if the object has enough space for the electronics. For 3D printed designs, please send me any visual material you have and ideas for the project and I will send a quote if not further information is needed.
Where can I find more ideas and inspiration before deciding on which case I want for my custom enail?
So many designs are possible from re-purposing old toys to custom 3D designed cases for your dream project. Places to look for cool cases include: garage sales, eBay, Amazon, antique shops, cleaning out the attic, and more. Check out the enail controller page to get the wheels turning and possibly come up with a whole new idea no one has seen yet.
Do you offer combined shipping on multiple items?
Yes, indeed! If the option is not available in the cart, please just contact and you will either receive new quote or a slight refund (if already paid) for the difference in combined shipping, if available.
Analog Enail vs. Digital Enail
What’s the difference between this analog enail and it’s digital counterpart? The main difference is that the digital version shows the temperature on an LED screen. Other than that, the way that temperature is adjusted is quite different. The analog version uses a rotary knob/dial vs. using up and down arrows on the screen of the standard digital version. Exact and tight temperature ranges may be tricky at first if you don’t have a infrared gun to measure (as pictured).
The digital version uses relays to pulse the power on and off; while the dimmer uses a variable resistor to “cool down” the outlet power to your desired temperature. You know exactly how hot the heat coil is at each second without having to use a heat gun when using an LED readout. For some, the digital LED readout is a must. Others prefer the simpler solution and quick heat up time that the analog version offers.
How The Dimmer Knob Works On An Analog Enail
An analog enail has a simple dimmer knob that “dims” the power source. The dimmer is like a gate that lets more or less heat go through the circuit to your enail heating coil. This analog knob design uses the same simple electronics that you would use to dim the lights in your house. Therefore you know it’s a solid and reliable solution. The only thing that is not so reliable are the actual temperatures, since variable factors such as other electronics running on the same outlet circuit can slightly affect the output. Just like when your lights dim a little when the washing machine comes on, the power may also dip out very momentarily. That being said, you can trust it for years and years to provide way more than enough heat. The switch will likely outlast the heat coil.
Analog Enail Temperature Adjustment
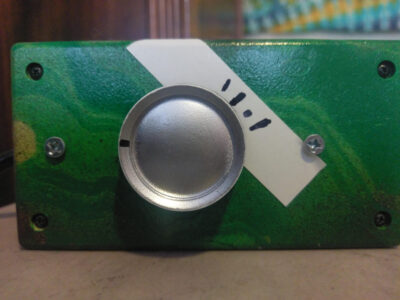
How do I find the right temperature using an analog enail? That’s a great question! It slightly varies from unit to unit, as well as the actual outlet situation in your house. Since analog is more sensitive you get small fluctuations in the power. For most people, the 1-o-clock position on the knob (about 60%) is more than enough. Once you go past this range the coil will start to glow red; which means you are climbing way past where you want to go. One savvy customer used a Ryobi temperature gun to determine that his optimal low temp range, just under 400F, is achieved by the method below. See the diagram below for his range markings on the dimmer knob and an explanation below that.
Yuri’s Dial Routine
So this is the setup that seems to work everywhere as long as nothing else is drawing power. The lowest mark is my standby/cleaning temp mark, it sits right around 375F. I will crank to either the second or third mark while drawing. However it will heat up and get very hot if you go all the way to the final mark for more than a few seconds so when drawing I usually return to the second mark on my dial.
Anytime the nail goes over 400F you start to taste the scorching and I will usually return to my lowest mark. I’m curious to play with the PID version josh got and compare the temps using my thermometer. I love tinkering with stuff like this I’ve been thinking about a more accurate nail design that includes a thermometer and throttles and settles based in that like the PIDs for a rosin press might do.