Plug Re-Wiring Service:
Offering heat coil plug re-wiring to match your RCCtools heat coil to your enail setup. Ask the previous seller first what your wiring configuration is. If they don’t respond check out the plug wiring guide and if you need more information or help we can figure it out together!
- Modify your RCCtools coil order to fit your existing controller
- Or I can make a 5′ long “extension adapter cable” which has the two different ends you need. This also gives you more freedom to move the rig (this is by request, please email first)
- Or I can create a junction box which allows you to plug in any standard XLR plug and then manually re-wire inside the adapter box using screwdriver-tightened terminals! (again, please email first)
- Longer cable lengths are available upon special order
- (contact for more info.)
Have a controller or coil that needs to have the wiring configuration switched for a new setup?
No problem! Your coil can easily be changed to fit your existing gear. Please find out first what wiring configuration your controller accepts by asking the company that you purchased from, or doing online research. Just ask the seller “what is the configuration for the 5 pins on the XLR plug?” This step is up to you; but it’s easy and most companies should be happy to inform you on this. If not, we may be able to deduce the wiring visually find out which wire is which. Please contact for help.
Get some room to move around your dabbing space…
If you need more length on that coil cord you’re in luck! Especially because if you also have a mismatched controller and heater coil, you can now create a custom extension cable that adapts your heat coil to your existing controller. An extension cable can now double as an adapter to stack functionality.
$12.99
Out of stock

First, are you handy with soldering?
Are you experienced in working with electronics? Do you have a soldering iron? You may be able to hack your own coil (at your own risk). Check out the RCCtools reply at the bottom of this handy little post at Reddit to see pictures detailing how to open up the coil. If you need more info, check out the wiring guide here.
The Dreaded Coil Mismatch Issue
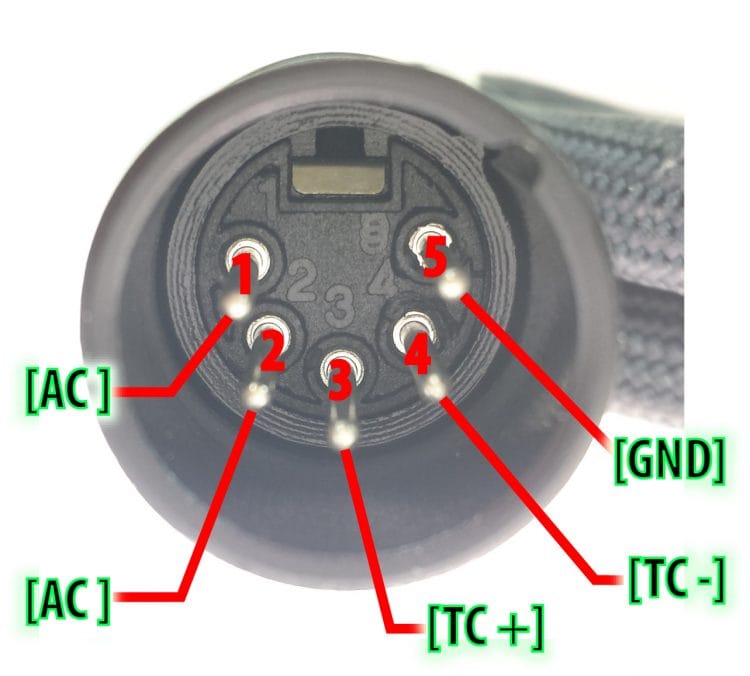
The heat coils are all made with basically the same components and therefore all have five wires. The thing is sometimes these wires are re-arranged differently on the heater coil plug connector. For example PIN 4 on one coil may go to the temperature sensor but on the other coil PIN 4 is the energy to heat the coil. If you plug one of them into a controller meant for the other type it will not work and probably even over-heat, which could be dangerous obviously! To find which heating coil will work with your controller, all that you need to know is the 5-PIN configuration on the controller’s plug and on the plug of the heating coil. If they are the same configuration they will work as long as it’s meant to run 120V AC power to the heating element (which 99% are). An example of a heating coil configuration that is most standard is: [PIN1=AC, PIN2=AC, PIN3=TC+, PIN4=TC-, PIN5=Ground]
Coil Re-Wiring Service Information
Due to this mismatch issue, some may need a heat coil re-wiring service. If the coil is used without re-wiring a new heat coil may cause problems with a new controller and cause malfunctions to occur. If you are looking for more information on how to find which wiring configuration matches your plugs, check out this handy wiring guide.
To find this simply search the product page where you purchased your gear or contact the seller and ask “Can you please tell me what is the 1-5 PIN configuration of the XLR plug?” They should be happy to tell you for the sake of having a functional product and also for safety’s sake to avoid possible dangerous misconfigurations. After you find this out simply copy/paste it over along with the configuration for your heat coil (if not from here) and your custom enail extension cable will be completed in around a week or less.

Conner Goertzen
I am a DIY electronics enthusiast who has been 3D printing since 2018, making custom e-nail controllers since 2016, and putting together custom electronic instruments since 2011.

